Wednesday, July 6, 2011

Handmade gift exchange pics

For my partner in the handmade gift exchange I made this baby boy mini album. 


And this is what my partner McKell made for me!

Shoe clips! So pretty :)

One side of my sign with art prints.
(The color is purple not blue.)

The other side!

Thanks McKell, love what you have made for me!!
Pin It

Friday, July 1, 2011

Handmade swap at Cricut Messageboards

I participated in my very first partner swap on the cricut messageboard. My partner was Jen and this is what all she made for me! I love purple. Everything she made was absolutely beautiful!! Thank you Jen
Pin It

Thursday, June 9, 2011

Altered Paint sticks

Here are my altered paint sticks for a swap on the Cricut Messageboard. I've never done these before!

First I painted my sticks. Then I made the flowers. I added homemade glimmer mist. Lots of inking. The butterflies are stamped, then I used embossing powder on them. They are glued on to give a 3d effect rather than flat. The front has a flip tag book that we can add small photos or journaling to. And pockets on the front and back with tags to do the same.

(I think the first picture looks a bit brighter than what they actually look in person. They're actually the same color as the bottom photo.)

It was a fun challenge to do!


Pin It

Sunday, June 5, 2011

Handmade Gift Exchange sign ups

I just signed up for the handmade gift exchange over at Craftaholics Anonymous! You sign up to make someone a handmade gift and in exchange they make one for you. Open to any and all kinds of crafters. If interested you need to hurry, the sign up ends tomorrow!
 Here is the link!
Pin It

Friday, April 22, 2011

Christmas Card Holder - Stashbusting Project 4

This is my last project with the Super Secret Stashbusting box this week. I still have other items that I haven't decided how to use just yet. Thank you to Heather at DollarStoreCrafts for letting me participate in the random crafting experience. It's been a fun experience and we should all try to use what we have. Just think outside the box and you can come up with a project using random items that you have laying around the house!

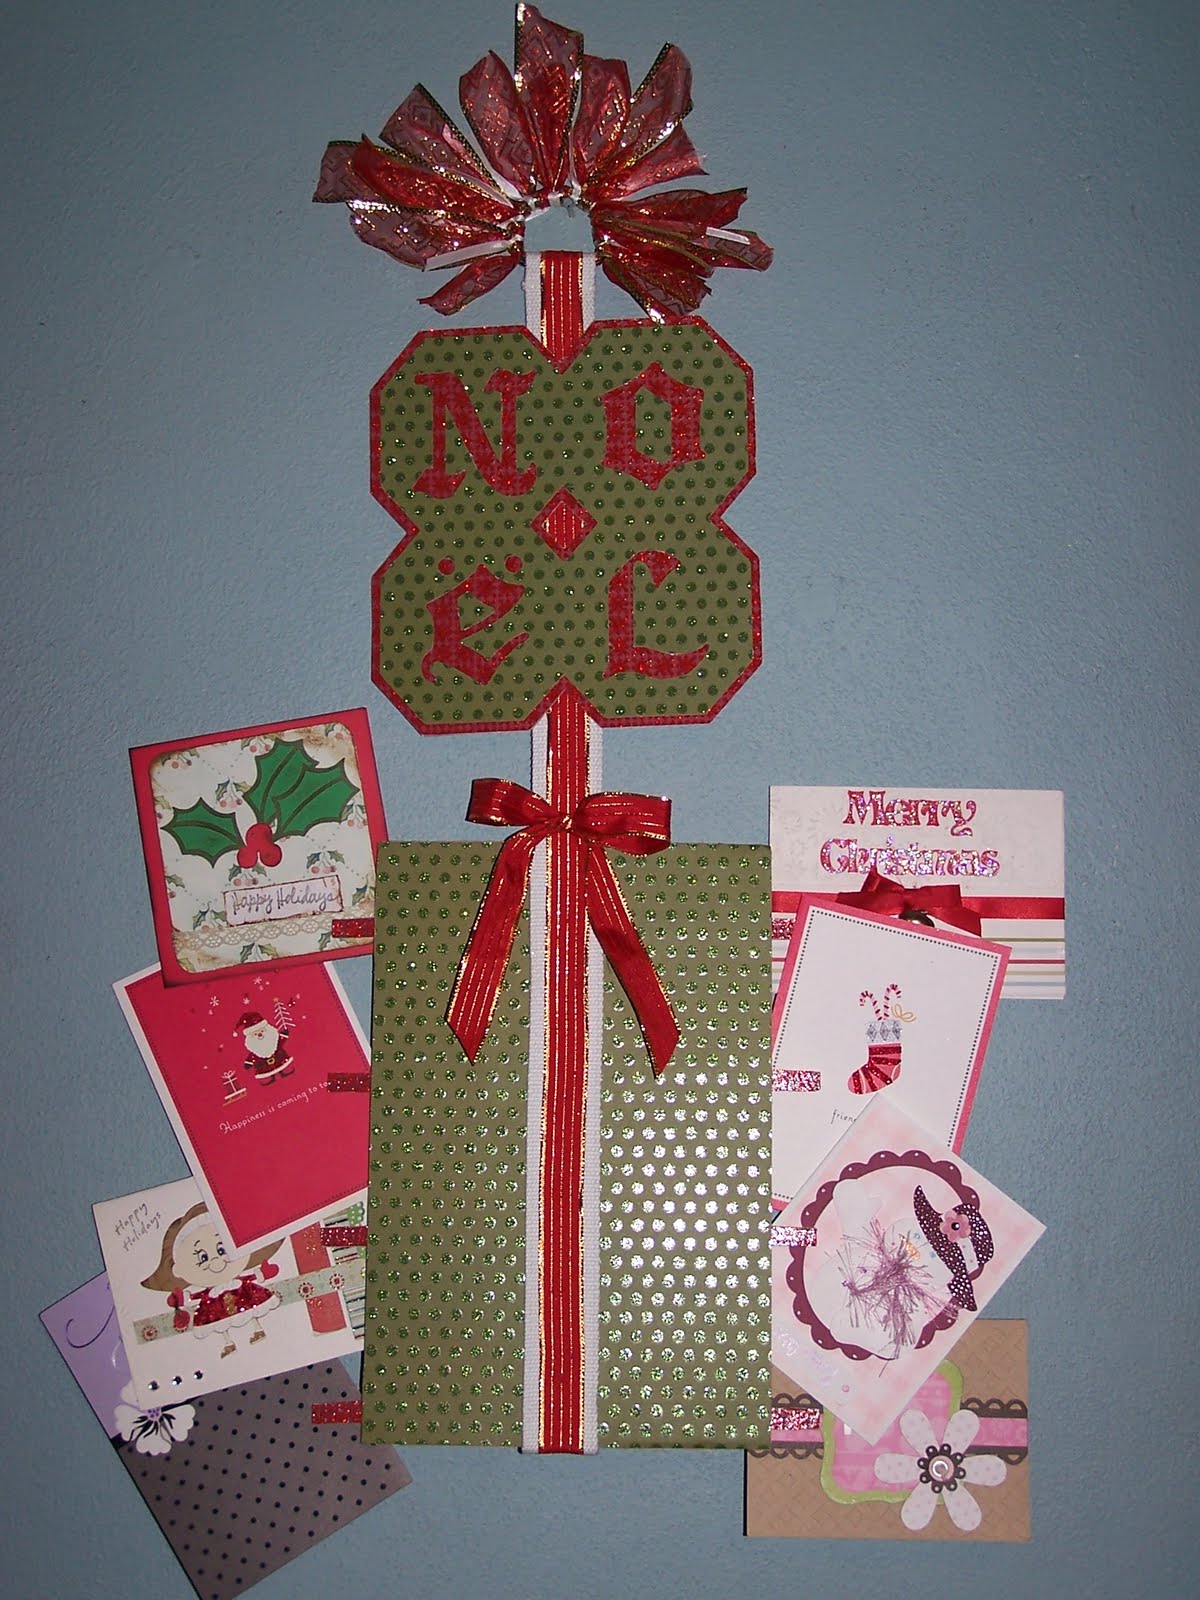
Stashbusting Project 4: Christmas Card Holder (I know.. wrong time of the year but I have been wanting to make one for so long, come Christmas time I never get around to it.)

Inside my stashbusting box I found a belt! 
At first I thought what can I do with that? Then it came to me. I have been wanting to make a card holder for quite some time now. You could always make a sign or a banner with the belt if you wanted to instead.

So to start off I cut the belt using the Westcott Scissors to a length I thought was ideal for my card holder.

I then decided to adhere some ribbon (from my stash) down the center of the belt and at the top I tied the ribbon to the buckles.

Next, I used a Cheerio box and my Cricut machine to cut out the Noel Sign. First I used the cheerio box for the back of my sign, I cut it out and then repeated the cut with the red pattern paper. I adhered the red paper onto the cheerio box cut.


Next, I used my Cricut and cut out the Noel in green pattern paper and adhered it to the red paper.(The Noel cut is from the Christmas Cartridge on the Gypsy)

Next, I used the Westcott brand x-acto knife that was included in the stashbusting box to cut out a rectangle piece from cheerio box cardboard. I adhered the green pattern paper to the cardboard and trimmed off the excess around the edges.


I adhered the two cardboard signs to the canvas belt. Then Noel sign on the front of the belt and the green rectangle to the back side of the belt. I decided to tie a bow to make the rectangle look kinda like a Christmas present.

Next, I used some clothes pins I had and mod podged the red pattern paper scraps onto them. I covered the top with Mod Podge as well. Trimmed off excess paper around the edges.


Once dry, I glued the clothes pins onto the back side of the green rectangle using Mod Podge and then when that was dry I finally added my Christmas cards!!

Hope you like my Christmas Card Holder and all the other Stashbusting projects this week! Thanks for stopping by my blog :)
Pin It

Thursday, April 21, 2011

Stashbusting Project 3

Still using items out of the stashbusting box that Heather at DollarStoreCrafts sent me!

Stashbusting Project 3: Flower Pot

Flower pot and sweater sleeve are from the stashbusting box. Paint is from my stash!
When I was getting ready to go to sleep, this idea came to me. Then the next day I seen something similar already on DollarStoreCrafts blog. Someone done it with a vase. Oh well, I figured I would go ahead and do it anyways.

I first painted the rim of the flower pot pink.
 

Next I just took the sweater sleeve and folded it. I didn't even have to cut it. It was sized perfectly for the pot! I slid the sleeve on and now it looks really pretty!  You could change it later using another sweater sleeve if you wanted a new look!

Next I pulled out these Fuzzy Stix from the stashbusting box. They are made by Creative Hands Crafts.

With the Fuzzy Stix I made flowers for the flower pot. You could use a real flower but I didn't have any on hand and this whole experiment is to use what we already have. Plus the fuzzy stix are so fun to use and part of the stashbusting project!  :)

Pin It

Tuesday, April 19, 2011

Stashbusting Project 2

Project number 2: Sweater Flower

I am using supplies from the stashbusting box that was sent to me from Heather at DollarStoreCrafts.com.

Inside my box I found pieces of material from a sweater.

I cut 3 circles in different sizes out using Westcott Scissors included in the stash box. The brad is from my stash.
I just layered the circles from biggest to smallest and stuck the brad through the middle.

Now we have a fun flower made from old sweater material!! Pin It

Monday, April 18, 2011

Stashbusting Project 1

The wait is over, it's now time for my projects using the stashbusting box Heather from DollarStoreCrafts.com sent me!!

Stashbusting Project 1: Goodie Bag

For my first project I chose the following materials from the box

White mittens, Westcott brand Titanium Scissors

 Cloth Napkins, White favor box

I started off by putting the box together. Super easy it just folds out and tucks in on the bottom. I painted my box pink with some paint I had. Next, I took a cloth napkin and cut a strip off of it. I cut the edges of one side to give it a little fringe. Then I used some pink paint mixed with water in a mini spray bottle. I sprayed the cloth napkin to add a bit of pink.

Next, I took the white mittens and cut out a circle and 2 long narrow ovals. Sorry, I guess I didn't take any pictures of this. With the mitten material I made a bunny face. From my stash I used some googly eyes and a brad for the nose. I drew on the whiskers and mouth. Colored in the ears a bit.

Here is my finished little goodie bag. Put some Easter candy in and it's all ready to go!!

Pin It

Tuesday, April 12, 2011

Super secret stashbusting!

Yesterday I received one of those flat rate boxes in the mail. Well, I never even look when I get packages as to who they are from. I just open and see what I got.. lol :)  As I pulling the items out, I am thinking what is this stuff? It was really random things. Not things I normally craft with! I am expecting a package from a giveaway I won but it wouldn't be in this big box. And I don't remember giving anyone else my address. Hmm, so I stop pulling things out and look at the front. It's from DollarStoreCrafts.com. Still not ringing any bells with me. Lol. I finish pulling out all the random items and I find a paper at the bottom then I knew....!

It's from Heather at Dollarstorecrafts.com!! I forgot that I even applied. We filled out the application with our addresses and no one knew who was picked till it showed up at our doors. Fun huh!!!

I have been chosen randomly out of 600 applications as 1 of 10 people, to participate in a random crafting experiment for DollarStoreCrafts.com. She pulled random things from her stash and sent to us to create something with it. It's just supposed to be a  fun exercise in creativity!!

I will be making things from the items I received, plus we can add a bit from our own stash if we would like but we are not allowed to buy anything for the project/s!

So Stay Tuned!!!


Pin It

Friday, April 8, 2011

Blog Award from Tiffany!

Thank you Tiffany at Sparkled Memories for passing this award on to me!! Please head over and check out Tiffanys cute blog!


Pin It

Monday, April 4, 2011

Huge Giveaway Time

Scrapping Mommy is having a huge giveaway! Some of her favorite things she is offering up as prizes, lots of great things. $200 in prizes!!!!!  Head THERE now to see how to get entered to win! Pin It

April Bunny Blog Hop

April Bunny Blog Hop - from 8:00am April 1st to 8:00am April 5th

In honor of Easter they have all created BUNNY themed card/projects. Please make sure you go through the whole hop there are tons of goodies up for grabs along the way. 20 stops on the hop!

It starts HERE!

Pin It

Wednesday, March 30, 2011

Eyelet outlet giveaway

Practical Scrappers are having a giveaway for old and new followers. Head over there to enter!

Pin It

Giveaway time at Purple Pumpkin

Purple Pumpkin is having a giveaway! Head to there now to find out how to enter!! They will be announcing the winner on April 28th. Pin It

Tuesday, March 29, 2011

100 follower giveaway!

Scrappinmargie is having an awesome giveaway on her blog for 100+ followers. The kit she is giving away looks amazing! Head to her blog to enter to win it :) CLICK  HERE

She is picking her winner April 15th!! Pin It

Lily Pad Cards!

There’s a new challenge blog in town with articles, swaps, interviews, videos, challenges, great prizes and MORE! Check out Lily Pad Cards! Pin It

Tuesday, March 22, 2011

Little boy mini

I have been following the mini album series tutorial over with Creations with Christina. This is my mini that I made following her video tutorials. Very similar to the one she made in the videos.

1st page the photo mat pulls out from the side.
We made our own lollipop flowers for the mini.
Little mini book is clipped on the mini page and can come out to flip through.

Another lollipop flower I made, the picture will slide in behind the pocket.
Frame page, picture slides in from top and journalling tags slide in and out from behind frame at the top.
Envelope with journalling tag/photo mat inside. I may add something more to the band that hold the envy in..
Another pocket page for photos/journalling.
Photo page and spot for journalling.
Simple photo page, embossed. And the page below is for photo and tags to journal on!


Tip 
Junkie handmade projects Pin It
>